Monday, February 16, 2015

CO2, H2O, Now Two and Epilogue Too


Now Two
It's one of those old-time Vermont weather days today: zero ºF (-18ºC) with gusts of 62 mph (100 km/hr); the 12th consecutive day of snow-covered solar panels and near zero kWh production; good days to have that wood stove cranking.
This post may be the last one for this blog.  Since the last post in 2012, Good Friend, Dora, had moved into the house she designed and now adds not only to enjoyment, energy, humidity, and CO2 production but also to energy and water consumption.  
A part of the basement had floor heating that until Dec 2013 had not been used.  A few walls were added to create a guest room and the floor heat is now being used.  This addition, created an extra heat load of course.  So with these changes we will look at the past year's (2013-14 )house energy performance and look at the humidity and CO2, also known as fresh air, condition.

The winter of 2013/14 was a cold one which saw a solid freeze of Lake Champlain to several feet thickness, the first time in the last 7 years, I'm told (and this year looks like a repeat of last year). The heating demand for the period of Nov 2013 - Nov 2014 according to weatherdatadepot.com was 7516 degree-days, 10 % more than the previous 12 month period. 

To evaluate the house energy performance with now two occupants, and an extra room to heat in a colder winter, we now have the aid of Smart Meters that help us visualize electricity flow at one hour intervals.  The meters were installed Jan 31, 2013.  Via internet access it is now possible to see solar electricity generated and bought from the utility in graphical format.  What is not shown graphically is the energy sold to the utility; this number has to be obtained monthly from the image of the bill via the internet.  The bill also covers a different monthly interval than the displayed data.  Thus, for this evaluation, numbers were once more taken manually from all of the monthly bills.


                                          2012-13          2013-14
Total house consumption =  3877 kWh        6495 kWh
*Solar Production =              5325 kWh       5470 kWh
*Energy bought from utility = 3173 kWh       5271 kWh
*Energy sold to utility =        4621 kWh       4246 kWh
Free Energy =                      704 kWh        1224 kWh
Degree-Days(Oct-May) =      6326               7332
Electrical Heat Energy =      3108 kWh        5554 kWh
Wood Energy estimate =     1400 kWh         2166 kWh
   * Utility data


Comparing the two years, one can see that the annual solar production was very similar; the free energy was quite larger the second year because two occupants use more energy than one and of course we thus sold less energy to the utility.  
The heating degree-days metric showed that it was 16% colder the second year though the heating energy expended including wood energy was 71% larger the second year.  Of course, the second year we were heating a second room in the basement and we are flushing 50% more water.  It wasn't a net-zero year. 


The good news to report is that the house was given a net-zero award for the prior year with only one occupant and a milder winter.  However, I'm still not too clear for what degree-day year net-zero is computed.

H2O
Dora thought it quite unreasonable to not plan for a bathtub in the house.  I had mentioned earlier my reasons for that choice.  Now that she lives here she does miss a bathtub and lets me know about it on occasion as she bathes at a neighbor's house and dreams of a claw foot oldie. 

Our water consumption increased of course, from 16  to 24 gal/day, as expected with more showers and clothes washing.
Our respiration also now produces more humidity in the tight house, requiring more frequent venting with the heat recovery ventilator.  The Inline windows continue to be a disappointment as their frame losses seem really high judging by their condensation patterns.  Other windows, such as Schüco, I've observed at another house, do not seem to have that problem.


External to the house, a partial gutter was added to capture about 40% of the rain water from the roof.  This water is stored in two 55 gal surplus olive drums and held sufficient water for most of last summer's garden needs and for an occasional outdoor shower, shown below.  A small pond is expected to be constructed this year for catching the overflow from the rain barrels and maybe for growing some trial rice plants.


CO2
One of the community residents complained about fatigue during the winter months of last year.  One thought was that the Oxygen in her airtight house may be too low as she hadn't run her heat-recovering ventilator.  Upon remembering that Oxygen is about 20% of the air it begged the question what the resultant CO2 level, nominally at 400 ppm (0.04%) might have changed to.


To investigate the CO2 levels in my airtight house, a CO2 meter was purchased and the observed results have been eye-opening.  The meter correctly measured the outside air at 400 ppm CO2. Within the closed living space in winter CO2 can build up to more than 1500 ppm for two people in the small 900 sqft. space without active ventilation.  

Now that a living space exists in the basement, a CO2 measurement in the basement showed much lower levels of CO2.  In fact, after a four week absence, the CO2 level dropped to 380 ppm showing that, indeed, concrete slowly sequesters the CO2 that was emitted in the production of the cement in the concrete. From Google University:

  • Cement production is responsible for about 1% of the greenhouse gases emitted in the US.
     
  • More than half (60%) of the CO2 emitted during cement production is due to calcination, a chemical reaction from heating limestone.
     
  • Concrete reabsorbs most of the CO2 emitted by calcination during the time it serves its useful life, and shortly after it is demolished and crushed.

So what is a dangerous level of CO2?  Google University shows various results.


The effects of increased CO2 levels on adults at good health can be summarized:
  • normal outdoor level: 350 - 450 ppm
  • acceptable levels: < 600 ppm
  • complaints of stiffness and odors: 600 - 1000 ppm
  • ASHRAE and OSHA standards: 1000 ppm
  • general drowsiness: 1000 - 2500 ppm
  • adverse health effects expected: 2500 - 5000 ppm
  • maximum allowed concentration within a 8 hour working period: 5000 ppm  


Epilogue
I realize that we are a weak species when I observe the birds and other wild life survive in the winter cold outside the window of my comfortable house.  Oh, but that there were fewer of us treading on this Earth more lightly and in balance with nature.

Thursday, December 27, 2012

Finally a Zero Energy House


I have now lived a complete year with my 4.5 kW solar PV array powering my house and Green Mountain Power Co. (GMP) and receiving from GMP electricity when I needed it.  It was an exceptionally sunny and mild year in Vermont which made it easier to be energy positive for the year.  Since the house is all electric, it's relatively easy to observe the energy flows as recorded by GMP on 3 meters as shown in the graphic.

When monthly readings are entered into a spreadsheet, this chart is generated, showing the monthly variations.

From the sum of the monthlies,
Total house consumption = 3877 kWh
Solar Production = 5325 kWh ( $0.06/kWh)
Energy delivered by GMP = 3173 kWh ($0.147/kWh)
Energy delivered to GMP = 4621 kWh ($0.147/kWh)
Free Energy = 704 kWh ($0/kWh)
it is observed that the house energy production far exceeded the total house consumption.
It should be noted that the house temperature in winter is set at 65 degF and that on sunny days the temperature in midwinter will rise to about 68 degF.  On cloudy days, the electrical heat is supplemented by a little wood stove heat.  Typically 4 pieces at around 14 lbs, burning for about two hours (14 lbs * 6000 BTU/lb * 0.63 (stove efficiency) = 53000 BTUs or ~15.5 kWh) is more than sufficient to raise the temperature on a 10 deg day to over 70 deg. This past year I burned around 1/4 cord of wood adding an extra approx. 1000 kWh of heat. Even with this extra heat, I still produced more than I consumed.  Of course, a cloudy and colder next year may make the year's energy balance negative.
So how cold was it in 2012?  A measure of heating needed for the year is the heating-degree days experienced here in Vermont. Weatherdatadepot.com says that 6326 deg-days of heating had to be covered to keep the house at 65 deg. As the electrical energy used in May through September (769 kWh) is not used to heat and most of the electrical energy consumed in the other months goes into heat, we obtain (3877+1000 - 769) kWh/6326deg-day = 0.65 kWh/deg-day, a metric reflecting the heating needs of the house on a daily basis.  Thus, at 25 deg, a 40 deg-day would require (65-25) x 0.65 = 26 kWh of heat, which might be supplied by electric heat, passive solar, or wood.    Now one might think this to be a handy number for estimating heating costs for a building, however, the "industry" prefers to rate by EUI or Energy Usage Intensity units, which for my house would be 4108 kWh/yr  x 3.412 kBTU/kWh x 1/ 800 sqft = 17.5 kBTU/ft2-yr or 5.135 kWh/ft2-yr, assuming in my case that I only heat to 65 deg and have no air conditioning. 

According to an article in Green Living, Winter 2013, Vermont's Greenest Residential Building  had an energy intensity of 7,800 BTU/sqft-yr and one of the Greener Residential Awards winner, the Habitat for Humanity house mentioned earlier in this blog had 14,020 BTU/sqft-yr.  I am not sure how the annual BTU number is arrived at.  Is the internal temperature set to 65 deg?  Does it include air conditioning?  How are wood stoves accounted for?

So, in summary, counting the solar PV array, this house is essentially a zero energy house in operation.

Now what does a 4.5 kW photovoltaic  array really mean?  How much energy can it really produce?  Some of this was discussed in a previous posting and there we showed the theoretically possible production and the predicted production for a fixed array pointing south at an inclination equal to the latitude here in Vermont.  To review, if this particular array has sun shining on it perpendicular to the plane of the array on a clear and low humidity day, it should be possible to produce 4.5 kW/hr.  In reality, off-normal reflection losses, clouds, rain, haze, snow, and converter limits and efficiencies reduce this number.  From actual performance readings taken on the best day of the month, the following daily maximum generation was observed:


In winter the sun is low in the sky (26 deg), the days are short, and the sun always illuminates the PV array.  In summer the sun is high in the sky (64 deg) and doesn't illuminate the PV array early and late in the day as it rises and sets far north of the PV array.  Thus the higher numbers form the spring and fall numbers where the illumination is best but where the converter limits converting if the instantaneous production exceeds 4.0 kW.  On a partly cloudy day in summer 20 kWh/day can be expected.  An overcast day will produce less than 10 kWh; an overcast day in late summer around 5 kWh/day, and snow covered panels less than 0.5 kWh/day.

Interestingly enough, my panels mounted at 45 degrees do not shed snow as easily as my neighbor's (different manufacturer).  So let it shine, let it shine and keep those panels snow free.

Friday, December 16, 2011

The One Year Report

On October 24th I celebrated the one year anniversary of having moved into the house with a dinner  of community-raised, free-range, organic roasted chicken shared with community friends.  The year passed surprisingly fast.  Much house performance data continued to be taken and some house enhancements hinted at from previous postings were completed.

The house energy consumption estimate of 5584 kWh/yr was surprisingly good when compared with the actual usage of 5816 kWh for the year.  Much of the 4% overage was undoubtedly due to the addition of a dehumidifier in the basement which used a surprising 5 kWh/gal of water, often once a day.  My usage compares with the average Charlotte Township household electricity consumption of 8848 kWh, which may not include heating.  As an aside, the  Passive House Standard specifies a maximum  total energy usage for my size house as 120 kWh/m²/yr x 80 m²  = 9600 kWh/yr.   


Efficiency Vermont  rated my house "FIVE STAR + (PLUS) = EXTREMELY EFFICIENT".  This is the highest STAR rating they give and is not really that difficult to achieve.  The more meaningful rating is the HERS rating.  The HERS Index is a scoring system established by the Residential Energy Services Network (RESNET) in which a home built to the specifications of the HERS Reference Home (based on the 2006 International Energy Conservation Code) scores a HERS Index of 100, while a net zero energy home scores a HERS Index of 0.  A 5+ star rating is given for a HERS rating of 70 or less.  I was given a rating of 62 based on having a dishwasher and an electric dryer which I don't have.  They estimated a total energy consumption of  14360 kWh/yr, over twice my actual consumption.   Maybe I should ask for a reevaluation?

The winter was cold with more snow than usual, yet surprisingly I never had to shovel my west side entry as the north winds always kept it swept.  As I am situated at the south end of a long green space, the north winds divide around the house creating swirls on the south side.  These swirls deposit wind blown snow in deep cone mounds, making the view out the south windows a very snowy scene. 

I used the wood stove only a few times, firing it from donated firewood.  I had real difficulty getting a good draft going and maintaining it with the outside combustion air supply.  After some investigating I found that the air flap located in the air intake outside the house was blocked by a mounting screw. Correcting that,  it now drafted better but the air flap offered too much flow resistance and was thus forced into an open position.  Now that the stove drafted better, I still had trouble starting the fire with wood stashed vertically in the small firebox.  The English language instructions were not very helpful so I went to the German instructions and noticed that the same model stove had an extra secondary combustion control to help start the fire.  They also recommended opening the ash grate for better air supply initially.  Furthermore, they gave more specific instructions on just how to start the fire successfully.  Maybe the US version has to meet different fire specifications and assumes that we're smart enough to know how to start fires in German stoves with fewer controls?  Summary: buy a Vermont made stove in the USA - they burn well and they're cheaper.

Spring came with 3 times the normal precipitation in April and May, making it very difficult for the farmers to get seeds established.  I had sowed some wildflower seeds on the north side of the house not knowing what to expect come spring.  Little happened at first with finally some tiny flowers appearing.  This was slowly followed by many other unknown varieties in blotches here and there.  The excessive rains had evidently rearranged the seeds spread the previous fall just prior to the first snow.  The "soil" that was backfilled after construction was mostly dense clay of the finest sort which one finds here on the Clay Plain, covered by 2 inches of sand and a sliver of "topsoil" with some cover seed.  In mid May I created seven 4' x 8' elevated planting areas on the south side of the house from 3 cubic yards of topsoil and compost.  I planted a variety of herbs, tomatoes, flowers, cabbages and some corn and beans.  The plants looked anemic and the soil supplier finally informed me that his soil mix lacked Nitrogen.  After addition of some organic fertilizer supplied by him, the plants started looking better and by fall had produced fairly well, but not as well as the gardens that had used Dawn's (the cow) manure.  It'll probably take years and much manure to get the soil well established.

This summer was warmer than usual.  Although we didn't see the temperatures that Maryland saw, we did have low 90s several times with relative humidity of 70-80%.  Indoor temperatures were controlled by open windows at night and closed windows on hot days.  There is little direct solar heating because of the roof overhang, though in the evening some direct heating was experienced through the west windows which had no curtains.  Internal temperatures rarely exceeded 80 degF but the attendant high humidity diffused into the basement raising the temperatures there to 70 degF with high humidity.  This high temperature required the use of a dehumidifier to avoid the formation of mildew in the dark basement.

Fall was unusually warm this year and still seems to be holding on into winter.  The root cellar needed more ceiling insulation based upon the first winter performance.  Thus 2" of blueboard was used in a lower ceiling which seems so far to moderate the outside influences on the root cellar temperature.  Currently, I still have some cabbages, celeriac, potatoes, and squash stored there alongside the wine and beer.  Next year will bring some decent shelving and more to store.


The 3-season sunroom, solarium for short, was completed at the end of summer.  It's purpose is to extend the season for some herbs and late season vegetable such as chard, to store and dry firewood during the winter, and to start and protect seedlings for the garden.  It also serves as a  protected area to dry clothes and to preheat the intake air for the heat  recovery ventilator.  On sunny days, the solarium temperature can exceed the outside air by 50 degrees, especially on snowy days.  At night the temperature stays about 10 degrees warmer.  I opted for single pain glazing for better heat gain and have bricks in the floor to help maintain any heat through the night.  I'm very happy with this addition.

It was always my intention to offset my electricity usage with solar photovoltaic generated electricity.  I wasn't to keen on placing solar panels on my roof for appearance sake so I investigated solar trackers as mentioned earlier.  As there was no space near the residences to place a tracker and because at the time I was told that they couldn't be placed on our community meadow which is under Vermont Land Trust protection, I had to finally go with roof mounted panels.  Alteris, working with Vermont Public Interest Research Group took care of the paper work and the installation.  The installation was straightforward as a utility shaft from the attic to the basement was a part of the original design.  While feeding the power cables from the attic to the basement, however, the workers trampled the loosely packed insulation and never properly restored it to its original blown-in condition, thus lowering the effective attic insulation in the trampled region.

I have 20 Suntech STP 225 panels mounted on my 45 degree roof.  At normal incidence on a really clear day they will produce 225 Watts each making the whole system a 4.5 kW system.  The generated DC power passes through a Solectria PVI 4000, DC to AC inverter which changes the panel's constant direct current to an alternating 60 Hz current synchronized to properly connect to the electrical service from the utility.  The internally located inverter has a display that shows current DC and AC power production as well as cumulative AC power production. An external power production meter indicates how much energy is produced and this amount pays 6 cents/kWh.  Another external  bidirectional meter, indicates my actual electrical usage.  Should my production exceed my usage, I will receive a credit at the current standard rate of 14.7 cents/kWh.  To date, since commencing production on September 15, I have produced over 1000 kWh and used 700 kWh.  I estimate that after the start of the new year I will be consuming more than I will be producing until around April, depending on how often I use my wood stove.


The estimated energy production for this solar array is 5200 kWh/yr, distributed as shown in the graph and based on local average insolation.  I have observed that in the short days near the winter solstice I can generate up to 18 kWh/day on a clear day.  On really cloudy days, generation is less than 1 kWh/day. On a snow-covered panel and sunny day, generation is TBD. As I now have an almost zero-net energy house, I think I will get it re-rated.

The cost of the system was $21,375. The State of Vermont rebated $3250 and the IRS promises to give a 30% tax credit.  This makes the cost of the system $11,750 or $2.60/W installed which compares favorably with nuclear power at up to $8/W .  Guarantees are 5 yrs on installation, 10 yrs on the inverter, and 25 years on the panels.  There is no periodic maintenance requirement.  The 50 yr roof warranty, however, is void in the area of installation.

Recently on a 20 - 30 degF day we had a perfectly blue sky day offering the opportunity to take some hourly data of PV power, sun room and indoor air temperature with no electrical heat contribution. The total PV production for the day was 25 kWh.  It can be seen that during the middle of the day the power curve shows a limit.  This is due to the panels' DC current being greater than the DC to AC converter can convert.


To summarize the whole house design and building experience: it went better than expected thanks to the many individuals involved.  The house is now my home and it feels snug and comfy.  What more could I ask for except possibly another 2 kWh/day warmth contribution from someone loving, caring, and humorous, sharing my bed and life.

Wednesday, February 23, 2011

The Assessment and Performance Report


It's amazing that already 3 months have passed since I moved into the house Oct 25th. It took less than a year to design and build the house.  My thanks to the designer, Dora Coates of Dovecote Design and builder, Tim Yandow and his many capable sub-contractors.

The view out the south windows since completion has changed from barren trees to a white scene for the last two months with temperatures mostly  below freezing, making for great cross country skiing and house heating performance observation.


Living In It
It took a few days to adapt to the new internal environment:
The quiet interior - no blowing air from air ducts every time the heat comes on; barely audible rain and howling wind; no perceived cold spots; the outdoor nearly present indoors due to the large southern windows; the lively acoustics largely due to the linoleum floor; the warm feeling from the adobe colored walls and cinnamon swirl colored floor; the rock-stable and very slowly decreasing basement temperature as we headed toward the minimum average temperature for the year;  the operation of the radiant floor water reservoir for the instant-on electric water heaters..... Some of these observations and more will be further explored in what follows.

All in all, I've gotten well adapted to the new house; it's become a part of me and we take good care of each other.  I strive to keep the air temperature at 65 degF  which means that the floor temperature, my only heat source,  has to be regulated at a slightly higher temperature depending on the outside temperature.  Typically, at around 10 degF outside the floor temperature needs to be 6 degrees higher than the desired air temperature.  No more cold feet.
Heating Energy Demand
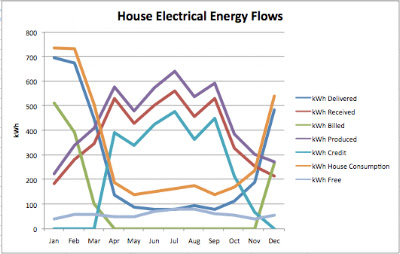
Since all of the energy going into the house is electrical which is turned to heat without loss and since heat flow out of the house is largely through the building envelope with some exiting via the wastewater and heat recovery ventilator (HRV), it can be said approximately, that all my electrical consumption goes to heat the house.  Extensive daily data taking has shown that my house heating needs to keep it at 65 degF is around 750 W/degree-day.  This means that for a 25 degF day, for example, 40 x 750 or 30 kWh of energy is needed.  On an annual basis for our average 7446 degree-days/year in this part of Vermont, the house is now estimated to need 5584 kWh/yr which is better than the 6500 kWh from the original heat-loss calculation for the house from week 14.  Compare this to the 2008 average annual US residential utility customer consumption of 11,040 kWh (EPA).  

Humidity and HRV Performance
The heat recovery ventilator's purpose is to bring in fresh air from the outside and expel the products of respiration (CO2, moisture, and other smells that may accumulate from cooking, etc.) and to do so by recovering heat from the warm stale air and add it to the fresh air.  It does this pretty well in winter, dehumidifying the indoor air, especially on really cold days.  For example on a 20 degree day with the outside humidity at 41%, the air coming in will be 55 degrees at  33% humidity.  The HRV has continuous low and high speed modes as well as a 50% duty cycle low speed mode.  I use the high speed mode mostly while cooking something odiferous.  The other modes are used mostly on sunny or warmer days.

House Heating and Cooling Rates
The sun at it's maximum angle of 25 degrees in the middle of winter certainly still has a lot of energy to heat the house.  Unfortunately, this winter has been less sunny than usual.

On a recent sunny day with the outside temperature in the teens and falling to negative numbers, the indoor air temperature rose from 61 degrees and stayed a comfortable 65 degrees for six hours with the heat turned off the previous night.  The floor temperature, however, slowly decreased in the 36 hours after the heat was turned off, from 69 to 63 degrees, being cooled in part by the colder basement (52 degF). After 36 hours it took 60 kWh and six hours to get the floor temperature back to normal.  The air temperature took somewhat longer to stabilize as all of the furniture and walls had to heated.

On warmer sunny days it can get too warm inside and the HRV needs to be run continuously or the windows opened on warmer days.  More data is needed in milder weather.

One might wonder how the temperature of the house's concrete wall varies with outdoor temperature variations, considering that the walls have an R30 outside insulation and an R10 inside insulation.  A test hole was bored to the concrete wall on the north side of the house for temperature monitoring. On days of stable outside temperature, the concrete wall was observed to be cooler by 25% of the difference between inside and outside temperatures, as expected.  The thermal mass of the concrete wall stores heat much like a reservoir stores water.  The rate at which the heat reservoir fills is a function of its capacity and net flow rates of heat, being limited by the Rvalues of the inside and outside insulation.  The capacity and Rvalues define a time constant  for the wall for a sudden change of temperature.  This time constant has been calculated as 9 hours.  It has not been verified by the sparse data taken to date in the presence of quicker varying external temperatures.

Blower Door Test Results
Efficiency Vermont personnel came by Feb. 4 to inspect the house and perform a Blower Door test.  This test is performed by installing a temporary "door" with a calibrated fan into the existing entry door way.  The inside air is exhausted  until a pressure difference of 50 Pascals (metric!; 1 lb/ft2) is achieved and then the air flow rate is measured via the Bernoulli principle.  This air is the sum total of all air leaking into the house via any paths that may exist.  On a cold day one can walk around and feel for cold air coming from windows, electrical boxes, and floor boards.
The house tested at 400 cubic feet per minute which computes to 3/8 of an air change an hour (ACH) for my house volume (not considering the basement).  According to a good reference on this topic  less than 5 ACH is considered a tight house requiring active removal of humidity, combustion, and respiratory gases.  And that is my case.


Stove Performance
The Beeeutiful (and dear) wood burning parlor stove has not been used regularly for lack of wood and for not messing with the heat data being taken.  

It heats plenty in the well insulated house.  Two hours is enough to raise the air temperature 4 degF.  On a freezing day, the heat stored in the stove's soapstone and house interior will take six hours to return to the original temperature.

The firebox is a little small, making it ideal for smaller pieces of wood.  It's not easy to start the fire in such a small space, however.  The curved glass design acts as a heat lens concentrating reflected energy into the center of the firebox enabling a single piece of wood to be burned successfully, something most other stoves cannot do so easily.  Also, one must be really careful opening the front door as rapid opening will draw the flame and dust out the opening. Shutting off the external air intake just before opening the door slowly seems to help.  It's a nice parlor stove though not so practical for 24 hour heating.

Vermont law requires an outside air supply for all new house construction.  This stove was designed to accommodate that requirement with a fresh air adapter.  The manufacturer of the adapter was of no help in getting the dimensions of the device, requiring a purchase first.  The device would not fit and had to be adapted.  Fortunately Metalworks in Burlington was a very capable place for custom modifications.  Another problem yet to be solved is condensation on the non-insulated aluminum fresh air supply ducting in the basement on very cold days.
Root Cellar Performance
As a reminder, the root cellar is the space below the shed.  It has a nearly 10ft ceiling with a gravel floor to the foundation soil.  The upper part of the ceiling is approximate 2 ft. above the outside soil and thus exposed to daily temperature and wind variation as there is currently no insulation on the cellar ceiling/shed floor and the ceiling has not been thoroughly air leak sealed.  Long term soil temperature variation are moderated by the 4" foam insulation on the concrete walls.  

When the external temperature drops to single digits, the root cellar temperature has been observed to drop below freezing requiring removal of fruits and roots.  For most of the winter it has hovered around 35 degF.  A two inch reflective polyisocyanurate ceiling insulation addition is being planned.
Water Usage. 
I was surprised to find that  the average per capita indoor water usage in the USA is 69.3 gal/day!  Having a water meter allows one to observe one's water usage and maybe adapt to less consumption if one cares to.  I was curios and found out that my one person household uses the following amount of water:
Toilet (5 flushes/day @ 1.3 gal/flush) = 6.5 gal/day
Laundry = 12 gal/wash   
Short shower (wet, lather, rinse) = 1.3 gal 
Full shower (as above with water running the full time) = 11.5 gal 
One-person daily dishes hand washed and dried = 0.6 gal/day
Measured average daily use =12.8 gal/day.

So if I were to flush with my high mineral content community well water and use soft rain water for the other uses, then my annual consumption of soft water might be around 2300 gal/yr or 307 cuft/yr.  On my 1277 sqft roof this would require on average a 2.88 in rainfall capture for the year.  Considering that the historical average monthly rainfall is 2.9"/month, where's the problem here?  Frozen gutters in winter? Three months or 600 gallons of storage?

Hot Water Performance
This house uses two Stiebel-Eltron instant-on electric water heaters, one for the shower and wash machine, the other for the kitchen.  Cold water entering the house is 45 degF in winter and gets preheated to 65-70 degF by the radiant floor in a dedicated water loop.  This pre-warmed water is what then feeds into the heaters.   To achieve temperatures greater than 105 degF the flow rates have to be limited by flow restrictors.  This works fine in the kitchen but not yet in the shower, largely because of the lack of a proper control valve for low flow rates.  Still looking....

Attic Performance
The attic design evolved after much discussion about venting and moisture infiltration from the non-impervious ceiling typically installed in houses.  Traditional thinking assumes that moisture will, nay should, escape via the ceiling into the attic to avoid moisture buildup within the house.  Once in the attic the moisture must be vented requiring soffit vents for air entering and ridge vents for air leaving.  This natural convection flow, assuming there's heat to drive it, should vent the humidity in the attic.  The alternative design based on the presence of a heat recovery ventilator does not depend on attic venting.  It uses a ceiling impervious to moisture thus avoiding the need to vent the attic rigorously.  Thus this house has neither ridge nor soffit vents, instead relying on two gable vents at opposite ends of the roof for attic air equalization with the outside air.

To test the performance, a remote reading temperature/humidity gauge was installed in the attic.  Data from this sensor shows that the moisture does not build up in the attic and pretty much tracks the external moisture and temperature in the absence of solar energy impinging on the roof.  On sunny days the attic does get warmer (no data yet for summer).   All temperature variations in the attic minimally affect the house temperature because of the R75 insulation.

Windows/Doors
The large windows on the south side have certainly brought the outdoors practically inside.  It's been enjoyable watching the change of seasons with the abundant winter weather this year.  And it allowed me to easily observe the growth of a 5 ft snow wall created by north wind driven snows swirling on the south side.  It's also been interesting seeing the moisture condensation patterns when the temperatures fall below 20 degrees.  It's become a part of my early morning rituals on those cold mornings to sponge up the condensation water from the bottom of the window frames.  Fortunately they are fiberglass and thus less susceptible to mold formation.

The condensation is not a sign of poor windows but the combination of the house's relatively high humidity (45-50%) and their position on the outside of the window well.  The fiberglass and wood doors to the outside, sitting flush with the internal wall, do not exhibit condensation as readily as their surfaces are kept warmer  from the room's warm air than the deep seated windows.

To illustrate the difference insulating shutters would make to heat loss as judged by condensation, I temporarily installed custom made R10 polyisocyanurate  aluminum clad panels on the inside and over the outside of the window frame in the bedroom, the smallest window.  As expected, the inside panel kept the inside heat from reaching the window and the window iced up.  The outside panel kept the heat from escaping the window by conduction and radiation and minimum condensation was noticed.  Is it time to start incorporating external insulating shutters into future window designs not only to cut down on condensation but also night time heat loss?

Floor Insulation Squabble
As a fair amount of heat can be lost from a heated floor to the cold basement below it, floor insulation becomes important.  Traditionally, insulation can be blown in between the 12" deep joists or a sheet of aluminized bubble insulation can be stapled to the top of the joists with a 1" air gap.  Getting good R-value numbers for these insulation approaches was difficult as achieved values are said to be installation dependent.  I don't like uncertainty in these kind of situations and decided to go with (more costly)1-5/8" polyisocyanurate sheet with an aluminum reflective foil on the floor side and a white aluminum foil on the basement side.  These sheets were attached to the bottom of the joists, creating a fairly nice looking ceiling for that part of the basement that has radiant floor heating installed for a future room.  The rest of the joists had Reflectix aluminized bubble insulation stapled to the top of the joists.  The purpose in mixing the types of insulation was to save some money and to evaluate their performances after completion of the house.


The evaluation has been completed to my best ability to do so.  As the picture shows, a piece of insulation with a known R-value is placed under the insulation to be evaluated.  The temperatures of the floor, the basement, and the surface between the test and the known insulation are then taken.  The R-value of the unknown material or structure (flooring, joists, air space, basement ceiling covering) can then be estimated with the following equation:

Ru = Rk(Th-Ti)/(Ti-Tc), where
Ru = unkown R value of material or structure
Rk = the known R value of the reference insulation
Th = is the warm temperature on the material
Ti = is the intermediate temperature at the material/reference insulation interface
Tc = is the cold temperature on the cool side of the reference insulation.

Measured results show the polyisocyanurate sheets with reflective foil, covering the joists and air space gave an equivalent R36, better than expected.  The Reflectix aluminized bubble insulation computed to less than R1.  I noticed upon installation of the test structure that I could feel the radiation form the warm floor coming right through the insulation and bare joists. Reflectix as installed was a waste of money!!

Construction Observations
One concern I had with concrete floors was their flatness. Even though the concrete contractor had many tools to even the surface of the poured concrete there were noticeable low and high areas.  Some areas had to be leveled prior to laying the linoleum flooring.  Rigid furniture required shimming or leg adjustments to avoid that rocking experience which I experienced the first night in bed.

The drywall boards were attached directly to the ICF mounting tabs and the resulting wall was only as flat as the ICF walls, which showed some deviation in places (see builder's commentary below).  The  baseboard trim as a result, being largely inflexible and straight showed noticeable voids between walls and floor.


Habitat Houses Commentary
The two Habitat for Humanity houses that were built down the street and occasionally discussed in prior postings are nearly completed.  Efficiency Vermont will install environmental monitors throughout both houses to monitor every energy related action for characterizing typical energy use in such Passiv Houses.  My house will be similarly instrumented by Efficiency Vermont thereafter for similar purposes.

What Next?
I look forward to spring and summer to pretty up the outside in a permacultural way and to observe the house behavior through a Vermont summer without air conditioning.  The spirit willing, I may report in another posting on my observations come November.  Thanks for reading.  


Builder's Commentary at my request:

The Insulated Concrete Form Experience: A Contractors View
By Tim Yandow


     I was influenced very early on in my career as a home builder and renovator by the growing green building movement, particularly the focus on energy efficiency and carbon neutrality in regard to both materials and energy consumption. So when I was introduced to the concept of Insulated Concrete Form (ICF) construction, I was immediately intrigued and looked forward to an opportunity to use them. I was delighted when Wolfger Schneider selected me and my crew to build his home using ICF’s. It allowed us to get a first hand experience of how ICF’s work and see their potential in the growing business of re-working the building paradigm in order to respond appropriately and responsibly to the challenges we face with Climate Change.

      One of the immediate and obvious advantages to building using ICF’s is the building envelope it creates, especially if the ICF walls extend above the basement or crawl space. In conventional framing, there is always the challenge of trying to create as air tight and continuous an insulated envelope with as few breaks or seams as possible, minimizing thermal bridging (conducting cold and heat from one side of an exterior wall to another) and the need to manage thermal bypass issues (air movement through the wall assembly). Since Wolfger’s house uses ICF’s all the way from the footings to the roof trusses, the foam insulation is continuous. The ICF system we used, Quad Lock, also offered a fair amount of flexibility in terms of the level of R-value that one can achieve, all the way from the basic R-28 ( 2 inches of foam on either side of the concrete core) to R-values above 40.

      From a building perspective, using ICF’s gives the builder the flexibility of creating their own foundations and wall systems without having to sub-contract the work to a forms crew. All that is needed is a little training from someone who knows what they are doing, a nice cool sunny day and a boat load of concrete.

      The wall systems themselves went up fairly easily and were quite fun to erect. Our supplier, Brian Kiniry, was sick of hearing us say “hey these are just like Legos”. I guess when you hear that everyday for a few years it can get wearing. But they really are like Legos which adds to the fun. Given that this was our first ICF house, we knew from the start that it would take us some time to attain our usual level of efficiency and that there would be a lot of problem solving to contend with. Both were true.

      We found that figuring out the door and window bucks was challenging, not so much constructing them, but keeping them from shifting during the concrete pour. The instructions we were given were not entirely clear in this regard, so we invented a system which worked fairly well by extending “legs” down either side of the buck to the subfloor, creating a solid base for the bucks to sit so the weight of the concrete would not push them out of plumb and level. This worked great.

      One issue which we faced right from the first pour to the last was settling of the forms. In theory, because the ICF blocks are uniform in height and width, the walls should come out to a perfectly even height once the concrete has been poured and smoothed out on top. We encountered variations in the wall heights in the basement by as much as a ½ inch. I am honestly still not sure why. We checked the height of the footings with a transit and found they were within ¼ inch. We found that any small variations from level or plumb tended to amplify as the walls grew taller. When we reached the top of the first floor wall after the final pour, the final height of the wall varied by 1 inch from one end of the building to another along its greatest length. As a result, we had to set the top plates with a transit and shim and subsequently insulate the gaps this created with foam. We found this very time consuming but vital to making sure the roof truss system went up properly.

     We found that this was also true in terms of the plumbness of the walls. The higher we went the harder it was to keep everything plumb. I think the staging system played a role in this given that the walls were straightened out with workers standing on staging screwed into the ICF tie network. Even though we checked and rechecked our string lines, we found that these shifted to a degree during the pour. Concrete is heavy stuff. But all in all, I was impressed with how straight the plain of the walls proved to be, even along its longest length of over 40 feet. I imagine that after doing several of these homes, one would get quite efficient at minimizing these discrepancies and assembling the walls more quickly. In terms of labor, we found we needed more time to assemble the walls than the ICF company estimated. Again, that was due to both our inexperience with this type of construction and the fact that we encountered more challenges than we expected. Everything always looks a lot easier on a DVD then it ever does in the field. The issues of wall height and plumbness were by far the two most difficult issues we had to contend with. I have not had the chance to talk with other contractors who have used the Quad Lock system to see what their experience was. But I would like to at some point. In the end, the house looks beautiful and we found that these issues did not effect the finish work very much or the roof system, but if we had not spent the extra time correcting them, I can see that the finish work would have been much more challenging.

      In terms of cost, the ICF walls are clearly more expensive and have higher embodied carbon in comparison to a stick framed wall and cellulose insulation which is what we typically use when building super insulated homes. I estimate that the difference in cost given the same R-value is around 20-30%. This is for the exterior wall assembly, not the cost of the entire house. This is true for foundations as well (the difference between a conventional concrete foundation and an ICF foundation although the ICF foundation will achieve a higher R-value per inch because it uses XPS foam rather than blue board for insulation).

      Although there were times I got frustrated with all of the problem solving we faced during the wall construction, in the end the project was a great success and I would consider using this system again. There are many ICF systems out there and I can not speak as to the relative differences in construction ease and cost between them. That would make for an interesting study. But I would say the Quad Lock system works fairly well and with more experience, I could see that they will just get easier and more efficient to use. Was I “wowed” by my ICF experience? Not entirely. I honestly feel that, having done both now, using a double stud wall assembly and cellulose insulation vs. ICF’s is a more cost effective and sustainable way to build even though you have to build thicker walls to get the same R-value and you have to be more careful with thermal bypass issues. This is primarily because one is building with wood and cellulose (made from recycled paper) instead of foam and concrete.

Wednesday, December 1, 2010

Weeks 19 - 26


 Oops! Where did those promised 2 1/2 weeks go?  I failed my readers and will probably loose readership.  My bad.  Well, a lot happened and there just wasn't any time to tell about it or maybe it was just fatigue at the end of the daze.  Though there was some time for recreation as for example the Harvest Festival in the huge barnyard of the amazing Shelburne Farms.

The week prior to the move was devoted to installation of the linoleum flooring which required several stages of leveling the concrete floor where needed, cleaning the floor, letting the linoleum acclimate to the floor temperature, cutting the linoleum, bonding it to the floor, and filling the seams.  Although the linoleum product is fine the installation was less than perfect as promised by the second choice installer. I had my doubts about him when he said, " I may not be the cheapest but I'm good".  More on this in a post-natal discussion next year.

After the floor installation, the second coat of paint was applied to the walls, the major appliances were delivered and installed, the custom bar/bookshelf cabinet  was mostly completed, and the base boards attached.  Stairs were also added to all entrances.


I returned to Maryland on October 16 to start packing for the big move.  Packing  took a long time and couldn't have been finished without the help of friends Bob, neighbor Leonard, surprise helpers and old friends Betsy and Rob, and of course  workhorse Geoffrey and his able companion Ferdinand.  Sunday, Oct. 24 we left with most of the stuff stuffed carefully into a 26 ft truck that Geoffrey and companion drove.  A relaxing 12 hour drive at the end of a good weather week brought everything safely to Vermont.  The following day we had plenty of community help unpacking the truck in good time.


Since I've moved in I've spent a lot of time looking for and shoveling my stuff around trying to squeeze 2000 sqft of stuff into 800 sqft of living space.  Of course as that doesn't really work, much is left in the basement for winter enjoyment: sorting, culling, burning, etc.

After I moved, in the kitchen instant-on hot water heater and drinking water filter were installed.  Yet to happen is the installation of the wood stove.  In the interim I've constructed a cardboard model to get used to its location.  Though most walls have been decorated with pictures, the bookshelf in the living room has not been attached to the wall yet.  I also completed the shed door pulley system for the ramp door.


While all of this was going on, I also spent a lot of time helping Rick, Kelly, Thom, Jonathan, Joe, and many others from the community erect the yurt in its new location and wiring it with electrical outlets and switches.  Two of my couches, one light, and several chairs and a table were donated to furnish it.  Let the parties, the yoga mornings, the game nights, etc.  begin.

Down the street, the Habitat for Humanity houses are also nearing completion.  Though they don't look it they have a generous amount of foil-backed foam insulation: 10" under the basement slab, 6" in the walls with 6" of cellulose, 2 ft of cellulose under the roof and triple pane windows.

So now life in a new home has started.  In this time of Thanksgiving, I'd like to thank everyone in the community for  your tolerance of the work generated traffic and noise and for your help and comments of support.  My special thanks to Mary, who had given me much support during this time.  And of course much thanks to the building team of Tim Yandow, Dave, John and their many helpers and subcontractors.  It has been a wonderful experience.  I wish everyone joyous holidays and promise an assessment report in the New Year.

Monday, September 27, 2010

Weeks 17 & 18


This may be the last posting before the final one, upon completion, now estimated to be in two and a half weeks.  Not much has been happening outside except for the start of some entry stair construction and the sealing of the natural pine ceilings of the solarium and the entry way.  Inside, however there has been much activity related to door installation and door and window trimming.  A first coat of paint has been applied by spray gun and the cabinets have started to be hung.  The cabinet appearance is funky because there was no attempt made to match adjacent pieces as to shade and structure.  It looks like a Cubist work of art - the glass is half full.

The electricity has been turned on and the electrical heat is working, currently being used to help dry out the concrete floor.  The picture shows electrician Steve, plumber, Randy and electrician Nick.  In the background you can see.......the 10 kW heater, expansion tank, and pump.  Not visible are the manifolds for the three zones (bedroom, main, and half of basement), the zone valves, the low water detector to protect the heater and many ball valves and faucets for maintenance.


The Yurt Hunt
Last week I participated in a Yurt hunt, that is to say, we went to Red Hook, NY and disassembled a 5 year old, 24 ft. diameter Pacific Yurt and hauled it back to our community to serve as an interim "Common House".  Although it was tricky disassembling the yurt, most of the work was disassembling the deck supporting it.  Yurts are great for milder climates and not too easily adaptable to colder, windy climates so we may have a few weeks where it just won't be worth trying to heat it.  With walls that are leaky and only have maybe an R5 insulation, the pellet stove will have to work hard on those windy below zero evenings.

The Solar Energy Collector Choices
In the last post it was estimated that without wood heat that I would use at minimum 6700 kWh of energy per year after subtracting the passive solar contribution.  So how can we capture that much energy with active solar?  

Many say that solar thermal is the best way to capture solar energy in the form of heated water.  But what is the complexity of a solar hot water system and how well does it perform?  Many also say that solar photovoltaic is inefficient and too expensive.  Let's look at the numbers for residential systems.

For both types of collectors, it should be noted that they are rated for the sun at full intensity shining at normal incidence, i.e. perpendicular to the collector surface.  Any deviation in angle from normal will lead to a greater proportion of the sun's energy being reflected from the transparent/translucent glass surface which protects the collector.  Thus fixed collectors cannot be as efficient as single or double axis sun tracking collectors.  Up to around 40% of potential sun energy is lost due to reflection experienced by fixed collectors.

A solar thermal system usually consists of one or more black body collectors which heat water.  When the water reaches a temperature greater than the destination temperature, a pump transfers the heated water, in most cases through a heat exchanger at the bottom of a large water tank.  A heat exchanger at the top of the tank can be used to supply heat from a backup source, be it electric or gas.  The heated water in the tank can be used for either washing or heating a floor.  A simple system consisting of one collector, tank, pump, differential temperature control and plumbing can cost in excess of $6K, I was told by one supplier.  Long periods of cold and overcast skies will require a backup heat source, yet possibly an extra expense.  Panel efficiencies are usually around  70% at normal incidence for either flat panel or solar tube collectors.   Considering that they are not pointing toward the sun at all times during the day, they are only receiving around 60% of the potential energy they could receive thus giving them in reality around 45% efficiency.

A solar photovoltaic system usually consists of one or more PV panels mounted either fixed on a roof   at an optimal angle or on a sun tracker.  The direct current (DC) produced can then be stored in costly batteries for off-grid usage or be changed to alternating current (AC) by an inverter for connecting to the grid and thus using the grid as a bank account.  This assumes that one is allowed to tie in by the local utility and assumes that the utility pays a reasonable rate for electricity received.  Installation of fixed panels on properly oriented roofs requires penetration of the roof's surface for the panel mounts and the wiring.  Other considerations for roof mounted systems are leaf debris and snow accumulation on either side of the panels and the beneficial heating of the roof in the winter months.  Trackers are complete systems that can be easily inserted into rigid soils with a small front loader.  Trackers are more complex mechanical and electrical systems with some using GPS for tracking and cell phone connections for monitoring and on-line reporting of performance.  A 4 kW tracker will have 20 solar panels, each capable now of operating at its maximum efficiency which may be around 17%.

Purchasing alternative energy equipment is currently supported by rebates and tax credits, not unlike the estimated over $500 billion support of fossil fuels worldwide (Where is this free market?).  For example, a 4000 W system, capable of generating around 5640 kWh annually in Vermont would cost $31,000.  After a $4000 rebate from the Vermont Renewable Energy Resource Center and a 30% federal tax credit, the final cost is $17,700 installed.

In the co-housing community in which I am building there is the opportunity to place the collector in the lower more wind-protected, yet wide open meadows rather than in the tight residential area.  This my plan and it will be appreciated by the sheep grazing there as they are always seeking shade in summer.  Now where is that pot of gold the rainbow last week was pointing to?


And finally a whazzit puzzle found around the construction site: